
Developers know very well that manually controlling and managing software deployment cycles are a pain. They’re tedious, don’t require any thought, and worst of all for us — boring. We love coming up with new solutions, drawing out ideas, and coding it out — not menial tasks. However, when we do develop novel solutions, we need to deploy them with a well thought out and engineered plan so they can benefit their users most effectively.
I talked a little about DevOps cycles in my last article and how we use Cycle to manage our cloud infrastructure (servers), containers, and deployments. In this article, I will show you how we automate testing, release control, and deployments using Continuous Integration — Continuous Delivery (CI/CD) pipelines, and how you can set it up.
Within our development and deployment process, we have three “environments” — testing/active development, staging, and production.
- Testing/Active development: This is where we develop and test (locally) to ensure components we’re working on meet quality standards.
- Staging: The staging environment is a replica of the production environment but that’s not used by our clients (or their clients). This environment is used to ensure test in production-like scenarios without the risk. We run all our regression testing here.
- Production: The money maker :)
We have branches setup for each of these environments, and we deploy into these environments by simply pushing our commits to, or merging into this branch. We setup pipelines to take care of the rest — Bitbucket takes care of building and pushing our containers to private registries, and Cycle’s API deploys them.
Bitbucket Pipelines
We host all of our projects on private repositories using Bitbucket — which is similar to Github and Gitlab. We love Bitbucket’s functionality, interface, and most importantly the support team. Bitbucket supports native pipelines which can be configured using YAML files within individual repositories.
Bitbucket pipelines can be used to define various steps to run when branches are pushed to, or when manually triggered. They have extensive documentation on how to use this feature, along with plenty of examples including deployments to AWS, GCP, Heroku, Azure, and more!
In each of the components associated with our projects (say AI worker bot, API, scheduler etc.), we setup pipelines for each branch. Bitbucket allows us to define default pipelines, custom triggered pipelines, and pipelines for each branch.
We use the master branch for active development and testing. We strongly believe in small teams (4 or fewer members per project) due to the autonomy and freedom the developers get, along with the efficiency of minimal management overhead. And for that, we use a feature branching Git workflow to handle component development, feature requests, and issue resolution. Individual branches are merged into master when local and isolated testing in done on the separate features. Our master pipeline calls a test command built within the project to run a series of tests on each component, and combination of components in the project. This can be a command for pytest (if you use that with Python), npm test (if this is a NodeJS npm project) or any other script you write yourself. If it passes the test, you can have it automatically merge the changes into the staging branch, by triggering another pipeline from the pipeline!
image: node:12
pipelines:
  branches:
    # Pipeline for the master branch
    master:
      - step:
          name: Stax UI Test
          deployment: Testing  # Set environment variables
          caches:
            - node
          script:
            - npm test # Run tests
            - git fetch # If successfuly, we get here... if not, the pipeline stops
            - git checkout -b staging
            - git merge master # Merge master --> staging
            - git push -v --tags origin staging:staging
    # Pipeline for the staging branch
    staging:
      - step:
          name: Stax UI Staging Deployment
          deployment: Staging # Set environment variables
          caches:
            - node
          script:
            - docker login -u $DOCKER_REGISTRY_USER -p $DOCKER_REGISTRY_PASSWORD registry.stax.ai
            - docker build -t stax-ui:staging .
            - docker tag stax-ui:latest registry.stax.ai/stax/stax-ui:staging
            - docker push registry.stax.ai/stax/stax-ui:staging
            - pipe: atlassian/trigger-pipeline:4.1.1
              variables:
                BITBUCKET_USERNAME: $BITBUCKET_USERNAME
                BITBUCKET_APP_PASSWORD: $BITBUCKET_APP_PASSWORD
                REPOSITORY: stax-pipeline
                CUSTOM_PIPELINE_NAME: staging ui # This will call: `babel-node run.js staging ui` which runs the pipeline for ui into the staging containers
          services:
            - docker
    # Pipeline for the production branch
    production:
      - step:
          name: Stax UI Live Deployment
          deployment: Production # Set environment variables
          caches:
            - node
          script:
            - docker login -u $DOCKER_REGISTRY_USER -p $DOCKER_REGISTRY_PASSWORD registry.stax.ai
            - docker build -t stax-ui:latest .
            - docker tag stax-ui:latest registry.stax.ai/stax/stax-ui:latest
            - docker push registry.stax.ai/stax/stax-ui:latest
            - pipe: atlassian/trigger-pipeline:4.1.1
              variables:
                BITBUCKET_USERNAME: $BITBUCKET_USERNAME
                BITBUCKET_APP_PASSWORD: $BITBUCKET_APP_PASSWORD
                REPOSITORY: stax-pipeline
                CUSTOM_PIPELINE_NAME: ui
          services:
            - docker
We setup the staging branch pipeline to deploy to a staging server cluster/environment on Cycle. With Cycle, you can keep a single server but have separate isolated environments. That’s what we do for smaller projects.

Before we automate anything, we need to understand the manual procedure.
In order to deploy a build to a staging environment, you first need to build it and push it to a registry. You could either use private registries (we do that for security and protection), or services like Docker Hub. The following commands can be used to build, tag, and push an image to a registry (for the stax-ui container):
$ docker login -u $DOCKER_REGISTRY_USER -p $DOCKER_REGISTRY_PASSWORD registry.stax.ai
$ docker build -t stax-ui:latest .
$ docker tag stax-ui:latest registry.stax.ai/stax/stax-ui:latest
$ docker push registry.stax.ai/stax/stax-ui:latest
Variables (eg. $DOCKER_REGISTRY_USER) need to be set in the deployment settings within the Bitbucket repository settings menu. These commands simply build and push an image to the registry. This doesn’t affect which environment it goes to.
Re-imaging Containers on Cycle
If you haven’t used Cycle to deploy your containers yet, take a look at their documentation — it’s very comprehensive and includes examples. They also have a page in their docs on re-imaging containers.
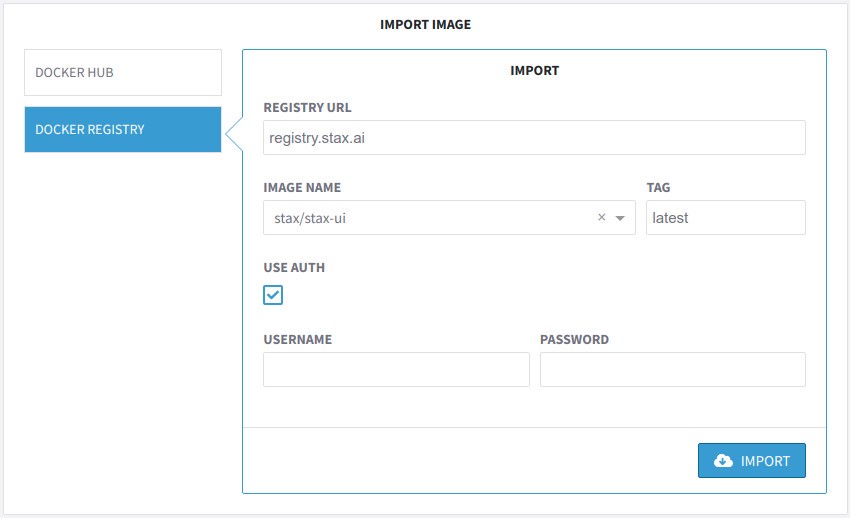
To import the image into Cycle manually, you would go into the Images page and run through the Import Image form (Import Image button on the top-right corner).
Once you import the image, you can re-image the container manually from within the container settings page.
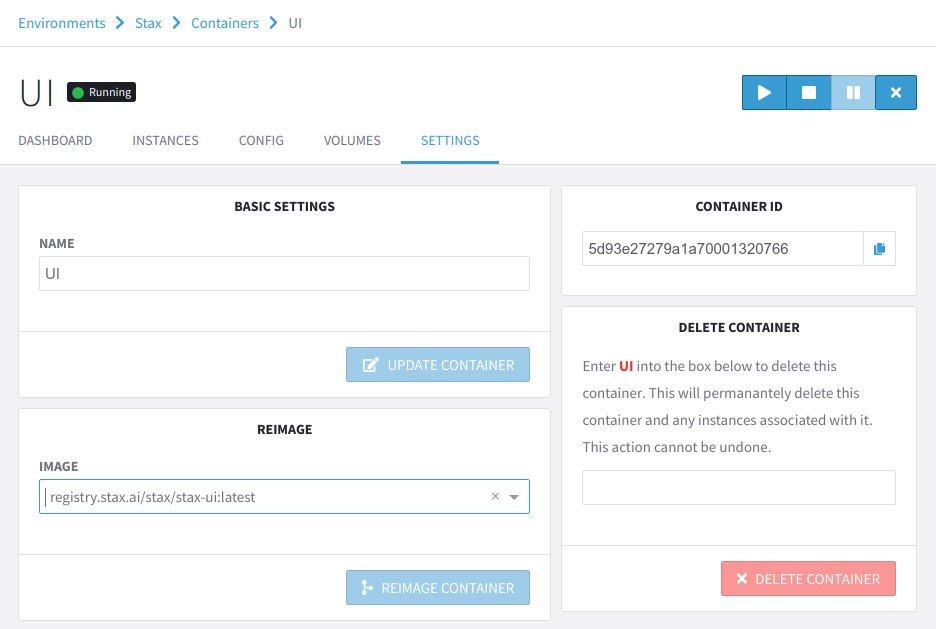
While re-imaging, the container will be out of service — so if you’re updating or re-imaging a production container, make sure it’s at a time that doesn’t affect operations. We generally schedule updates for 1 AM and generally only on weekends. If there is an urgent fix required, we check with our clients and make sure they ramp down before we push.
Cycle’s interface already does a good job of making it straightforward but we developers are lazy. We’d like to save every second possible, so we can focus on what matters (and what’s fun!).
Automation using the Cycle API
Cycle has a very powerful API — and it’s the same API that their portal uses. Their API is accessible via HTTP requests or an npm library — @cycleplatform/cycle-api.
We put together a quick NodeJS project that automates the re-imaging process. In Cycle, when an image build is requested, it creates a job that runs in the background. We have a function to build the requested images using the Images.build API endpoint which also queries the job status every second until it’s complete.
// Load environment variables
import dotenv from 'dotenv';
dotenv.config()

import { Images, Jobs } from '@cycleplatform/cycle-api';

export async function pull(targets) {

    const jobs = await Promise.all(targets.map(async imageName => {

        const res = await Images.build({
            token: process.env.CYCLE_API_KEY,
            hubId: process.env.CYCLE_HUB_ID,
            value: {
                source: {
                    docker_registry: {
                        url: process.env.DOCKER_REGISTRY_URL,
                        target: "stax/stax-" + imageName + ":latest",
                        username: process.env.DOCKER_REGISTRY_USERNAME,
                        password: process.env.DOCKER_REGISTRY_PASSWORD
                    }
                }
            }
        });

        if (!res.ok)
            return console.log(res.error);

        return {
            component: imageName,
            jobId: res.value.data.job_id
        };

    }));

    ...portion that checks job status and waits for the image to be built...

    return images;
}
This is accomplished with the Jobs.getSingle endpoint. The function returns the a list of image identifiers that were built.
// Track job progress
const images = await Promise.all(jobs.map(async job => {

    let jobCompleted = false;

    while (!jobCompleted) {

        // Wait for a second
        await new Promise(resolve => setTimeout(resolve, ms)); // We moved this into a separate function

        // Fetch job status
        const jobState = await Jobs.getSingle({
            id: job.jobId,
            token: process.env.CYCLE_API_KEY,
            hubId: process.env.CYCLE_HUB_ID
        });

        if (!jobState.ok)
            return console.log(jobState.error);

        jobCompleted = (jobState.value.data.state.current === "completed");

        // If completed, return the image ID
        if (jobCompleted) {
            console.log("stax-" + job.component + " image built");
            return {
                ...job,
                imageId: res.value.data.tasks[0].output.image_id
            };
        }
    }
}));
We also have another function that deploys a series of images. We keep a map of specific containers associated with each component (eg. stax-ui has only one container with multiple instanced, but stax-worker is deployed on a global pool, auxiliary pool, and dedicated pools for clients). For each container mapped to a component, the Containers.reimage API endpoint is used update the container images.
import { Containers } from '@cycleplatform/cycle-api';
// Container IDs associated with each target (EXAMPLE!)
const staxContainers = {
    'ui': ['5d93e27279a1a70001320766'],
    'api': ['5d93e2bf79a1a70001320767'],
    'email': ['5da21288a99b6b00011667ed'],
    'cron': ['5da77ae0a99b6b0001166804'],
    'worker': ['5db281a7a99b6b00011668d2', '5db0eac0a99b6b0001166899'],
    'trainer': ['5db251c2a99b6b00011668cd', '5da5f442a99b6b00011667f6']
};

// Input images must be the output of pull
export async function deploy(images) {

    for (let image of images) {

        for (let containerId of staxContainers[image.component]) {

            const res = await Containers.reimage({
                id: containerId,
                token: process.env.CYCLE_API_KEY,
                hubId: process.env.CYCLE_HUB_ID,
                value: {
                    image_id: image.imageId
                }
            });

            if (!res.ok)
                return console.log(res.error);

        }
        console.log("Reimaging: " + image.component);

    }
}
We have this project setup to build and deploy components triggered by command line arguments. For instance, if we want to build and re-image the UI and API, we would call:
babel-node run.js ui apiTo do that, the run.js script is setup as such:
// Load environment variables
import dotenv from 'dotenv';
dotenv.config()

import { pull } from './pull';
import { deploy } from './deploy';

async function run(components) {
    const images = await pull(components);
    await deploy(images);
}

run(process.argv.slice(2));
In order to not have to deploy this on a designated container, we utilize Bitbucket’s CI/CD servers. The bitbucket-pipelines.yml file in the pipeline control project is set up to accept custom manually-triggered pipelines (triggered by the individual components’ staging/production pipelines) and call the script.
image: node:12
pipelines:
  custom: # In order to trigger manually (or from another pipeline)

    # UI Deployment
    ui:
      - step:
          name: UI Production Deployment
          deployment: Production
          caches:
            - node:
          script:
            - npm install
            # We decided to use ES6 so we need babel to transpile it, so the dev dependencies...
            - npm install -g @babel/cli
            - npm install -g @babel/core
            - npm install -g @babel/node
            - npm install -g @babel/preset-env
            - babel-node run.js ui

    # API Deployment
    # ... and the other components to the project
    # For the API for example, it would call: babel-node run.js api
And that’s it! With a single git push (or merge), the sequence is initiated and your push gets deployed on live servers!
Need Help?
Aptus is a custom software (primarily AI) development services company. With the current state of cloud technology, we love using it to deploy powerful and horizontally scalable on-demand AI workers. This led us to learn the intricacies of cloud systems and deployment strategies. Let us know if you’d like help streamlining your deployment cycles using CI/CD pipelines, or if you need any help with your project at all.


