What Is A Minimap?
At some point we've all used an image viewer or a map application, for example, that allows you to view an image, zoom in and out, and drag the image in any direction, while conveniently conveying which portion of the image is visible in a miniature of the full image in the corner of the screen. The visible portion of the image can be shown in a number of ways, like having an outline surrounding the visible part, or being grayed out except where it's visible. This is a minimap.
One Approach To Creating A Minimap
As with everything in software design, there are multiple ways to approach this problem. The strategy we're going to take here is to calculate the visible portion of the image in terms of its absolute coordinates in relation to the screen, that is, as a percent of the image size. We will then use that information to construct the minimap's visible rectangle.
Initial Setup
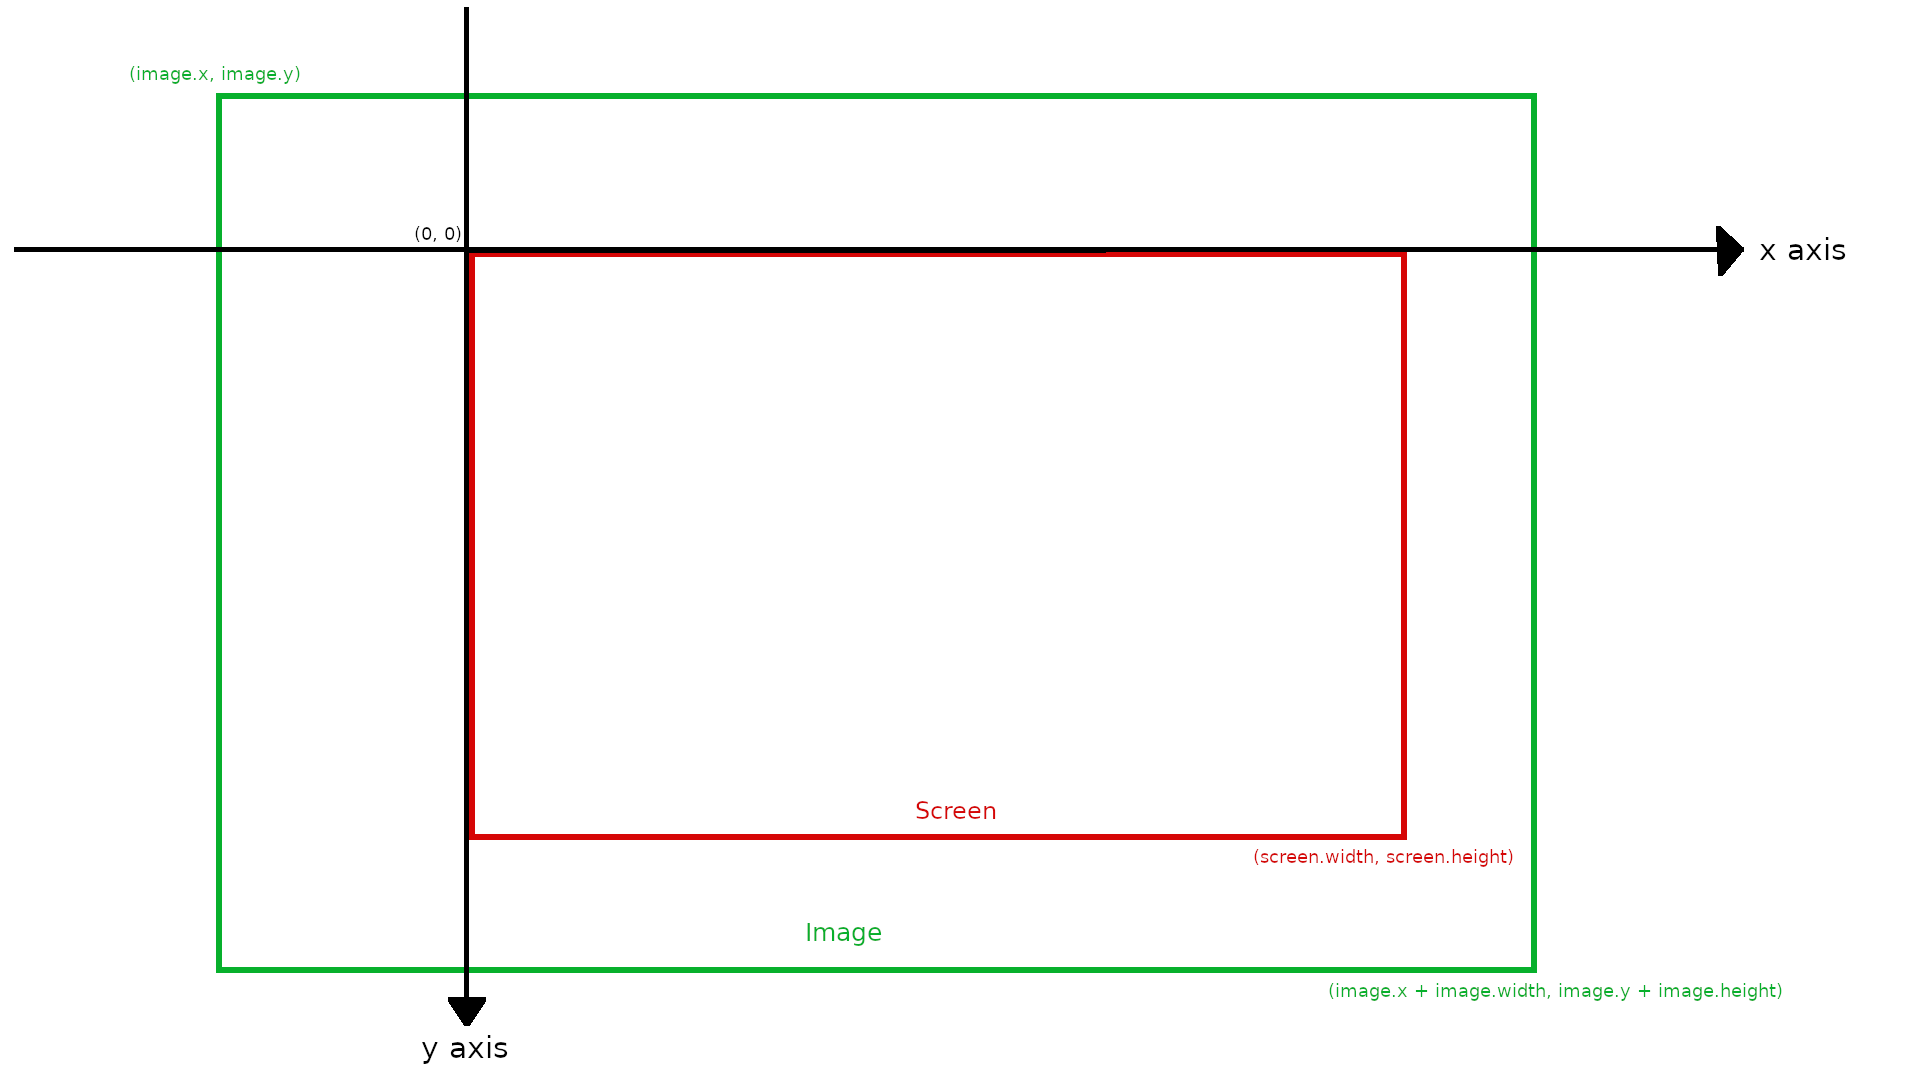
During use, the image size and position are changed, giving a smooth user experience of zooming and panning. The image coordinates at any given time will be in terms of the x and y position of its top left corner, as well as its width and height.
In this example, we will assume the image has a size of 1200x900, and the x and y coordinates will both start at zero, so the top left corner of the image will initially be aligned with the top left corner of the screen. These parameters will obviously change as the image is zoomed and panned.
The minimap position and size is subjective, but should retain the same proportions as the original image. In this example, we'll place it in the bottom right corner of the screen, with some padding. It will have a width of 200, with its height calculated according to the image width to height ratio.
Calculate the dimensions of the image, screen, and minimap
// Initial image coordinates and size
const image = {
    x: 0,
    y: 0,
    width: 1200,
    height: 900,
}

// Screen dimensions
const screen = {
    height: window.innerWidth,
    width: window.innerHeight,
}

// Minimap position and dimensions
const minimapWidth = 200;
const imageWidthHeightRatio = image.width / image.height;
const minimapHeight = minimapWidth / imageWidthHeightRatio;
const minimapPadding = 20;

const minimap = {
    x: window.innerWidth - minimapWidth - minimapPadding,
    y: window.innerHeight - minimapHeight - minimapPadding,
    width: minimapWidth,
    height: minimapHeight,
}
Calculating The Visible Area Of The Image
Now we calculate the visible portion of the image using the dimensions of the image and screen that we calculated above. We will calculate the left, top, width, and height for the visible rectangle in absolute coordinates. Since the absolute coordinates are percentages, they should be between zero and one, which we use the min and max functions to enforce.
// Calculate visible percent of image
const left = Math.max(0, -1 * image.x / image.width);
const right = Math.min(1, (screen.width - image.x) / image.width);
const top = Math.max(0, -1 * image.y / image.height);
const bottom = Math.min(1, (screen.height - image.y) / image.height);

const percentVisible = {
    x: left,
    y: top,
    width: right - left,
    height: bottom - top,
}
Creating The Minimap
The minimap is made of three components, which are layered on top of one another.
Layer 1: The Base Layer
This is just the full image as the bottom layer of the minimap.
// Layer 1: The Base Layer
<img
    src='path/to/image.png'
    style={{
        position: 'absolute',
        left: minimap.x,
        right: minimap.y,
        width: minimap.width,
        height: minimap.height
    }}
/>
Layer 2: The Tinted Layer
This is a tinted, transparent layer above the image, which gives the impression of shading the hidden portion of the image
// Layer 2: The Tinted Layer
<div
    style={{
        position: 'absolute',
        left: minimap.x,
        right: minimap.y,
        width: minimap.width,
        height: minimap.height,
        backgroundColor: 'rgba(0,0,0,0.5)',
    }}
></div>
Layer 3: The Visible Layer
This is the visible part of the image being "exposed" through the tinted layer. This appears as a floating div that has in it the visible portion of the image. The visible layer's main div's position and size will be set using the percentVisible variable that we calculated earlier. Its internal image will then be shifted to the top left corner of the minimap using the marginLeft and marginTop css properties, and scaled to make it occupy the entire space of the minimap. We'll set the main div's css overflow property to "hidden", which will hide the part of the image that is not inside the main div. This is the key part that makes the visible rectangle look like it's being exposed through a tinted screen, following the user's zoom and pan actions.
// Layer 3: The Visible Layer
<div
    style={{
        position: 'absolute',
        overflow: 'hidden', // hides the internal image that is expanded outside of this div's boundaries
        left: minimap.x + minimap.width * percentVisible.x,
        right: minimap.y + minimap.height * percentVisible.y,
        width: minimap.width * percentVisible.width,
        height: minimap.height* percentVisible.height,
    }}
>
    <img
        src='path/to/image.png'
        style={{
            position: 'absolute',
            marginLeft: minimap.width * percentVisible.x, // shift to left
            marginTop: minimap.height * percentVisible.y, // shift to top
            width: minimap.width,
            height: minimap.height,
        }}
    />
</div>
Putting It All Together
Here is all of our code in a React functional component.
import React, { Component } from 'react'

const ImageViewer = () => {

    // Initial image coordinates and size
    const image = {
        x: 0,
        y: 0,
        width: 1200,
        height: 900,
    }

    // Screen dimensions
    const screen = {
        height: window.innerWidth,
        width: window.innerHeight,
    }

    // Minimap position and dimensions
    const minimapWidth = 200;
    const imageWidthHeightRatio = image.width / image.height;
    const minimapHeight = minimapWidth / imageWidthHeightRatio;
    const minimapPadding = 20;

    const minimap = {
        x: window.innerWidth - minimapWidth - minimapPadding,
        y: window.innerHeight - minimapHeight - minimapPadding,
        width: minimapWidth,
        height: minimapHeight,
    }

    // Calculate visible percent of image
    const left = Math.max(0, -1 * image.x / image.width);
    const right = Math.min(1, (screen.width - image.x) / image.width);
    const top = Math.max(0, -1 * image.y / image.height);
    const bottom = Math.min(1, (screen.height - image.y) / image.height);

    const percentVisible = {
        x: left,
        y: top,
        width: right - left,
        height: bottom - top,
    }

    return (<>
        {/* Layer 1: The Base Layer  */}
        <img
            src='path/to/image.png'
            style={{
                position: 'absolute',
                left: minimap.x,
                right: minimap.y,
                width: minimap.width,
                height: minimap.height
            }}
        />

        {/* Layer 2: The Tinted Layer */}
        <div
            style={{
                position: 'absolute',
                left: minimap.x,
                right: minimap.y,
                width: minimap.width,
                height: minimap.height,
                backgroundColor: 'rgba(0,0,0,0.5)',
            }}
        ></div>

        {/* Layer 3: The Visible Layer  */}
        <div
            style={{
                position: 'absolute',
                overflow: 'hidden', // hides the internal image that is expanded outside of this div's boundaries
                left: minimap.x + minimap.width * percentVisible.x,
                right: minimap.y + minimap.height * percentVisible.y,
                width: minimap.width * percentVisible.width,
                height: minimap.height* percentVisible.height,
            }}
        >
            <img
                src='path/to/image.png'
                style={{
                    position: 'absolute',
                    marginLeft: minimap.width * percentVisible.x, // shift to left
                    marginTop: minimap.height * percentVisible.y, // shift to top
                    width: minimap.width,
                    height: minimap.height,
                }}
            />
        </div>

    </>)
}

export default ImageViewer;
Final Thoughts
By adding the minimap to an application, it creates a great experience for the user, allowing them to always be aware of what part of the image they're viewing. It gives instantaneous feedback and awareness that makes the application more user friendly.
A great feature to add once this is in place, is the ability to click on the minimap to move the main image.
Happy coding!